D-4.2 Testing Methods
Safety is of paramount importance when conducting leak tests. Even at relatively low internal pressures, leak testing can generate very high forces that can be dangerous if suddenly released by the failure of a joint, system component, or testing component. Air testing is inherently more dangerous than water testing, since air is highly compressible and expands quickly when pressure is released. If high air pressure is used, this expansion can be violent.
Always take safety precautions, such as the following, when conducting leak tests:
- Install all test plugs in a manner that prevents blowouts. Restrain pipe, components, and test equipment from moving in the event of a failure.
- Ensure that all air pressurizing equipment used for testing includes a regulator or relief valve set no higher than 63 kPa (9 psi) to avoid over-pressurizing.
- Keep people not involved in testing a safe distance away while testing.
- General safety instructions for inflatable test plug usage:
- Read and understand the safety instruction sheet before using a test plug.
- Always wear PPE.
- Do not enter the safety zone when test plugs are under pressure.
- Measure the pipe diameter accurately before selecting a test plug.
- Never use a test plug in a pipe size different from the recommended usage range.
- Always inflate the test plug to the recommended pressure shown on the plug.
Test Equipment
Different test equipment will be required depending on the type of DWV test that will be performed.
Test Plugs
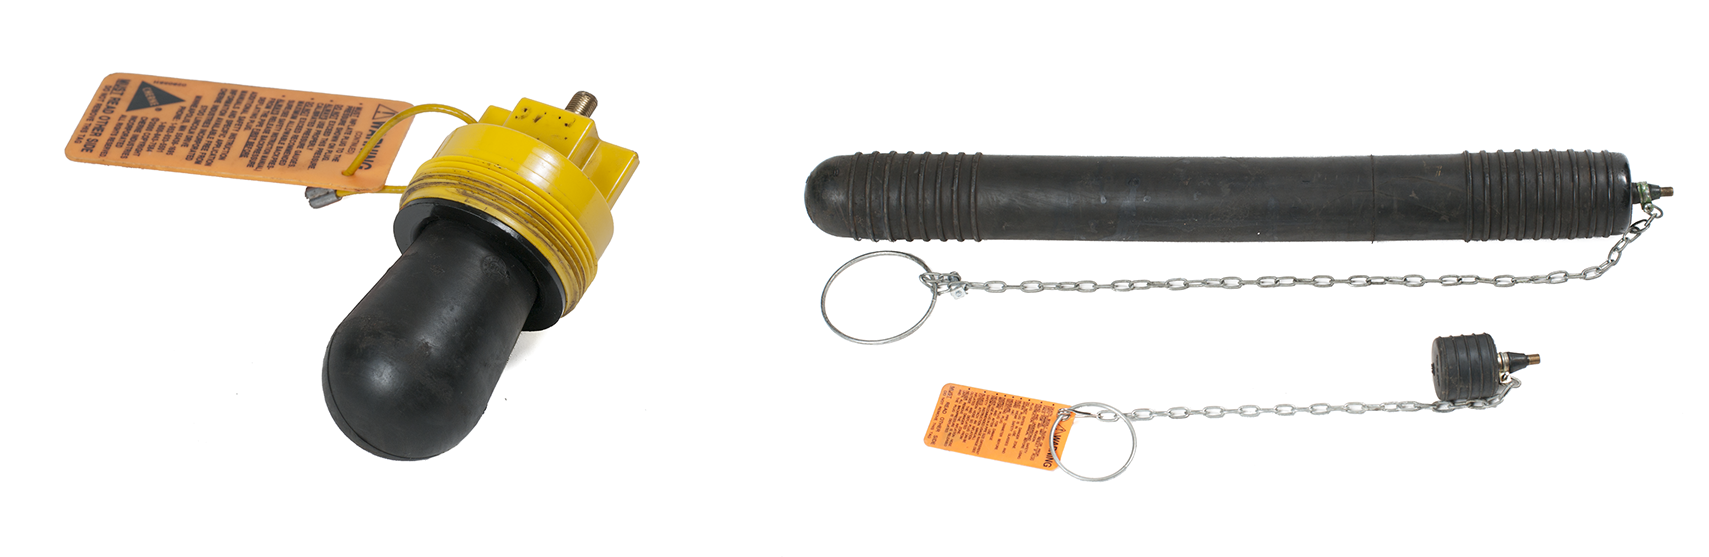
Whether the test is by water, air, or smoke, all openings in the test section must be sealed. Test plugs are often used in the industry because they may be used repeatedly and are, therefore, cheaper than one-time-only test caps. Test plugs are available in a number of configurations, such as inflatable for use in a line cleanout or inflatable for use in a wye fitting (Figure 1).
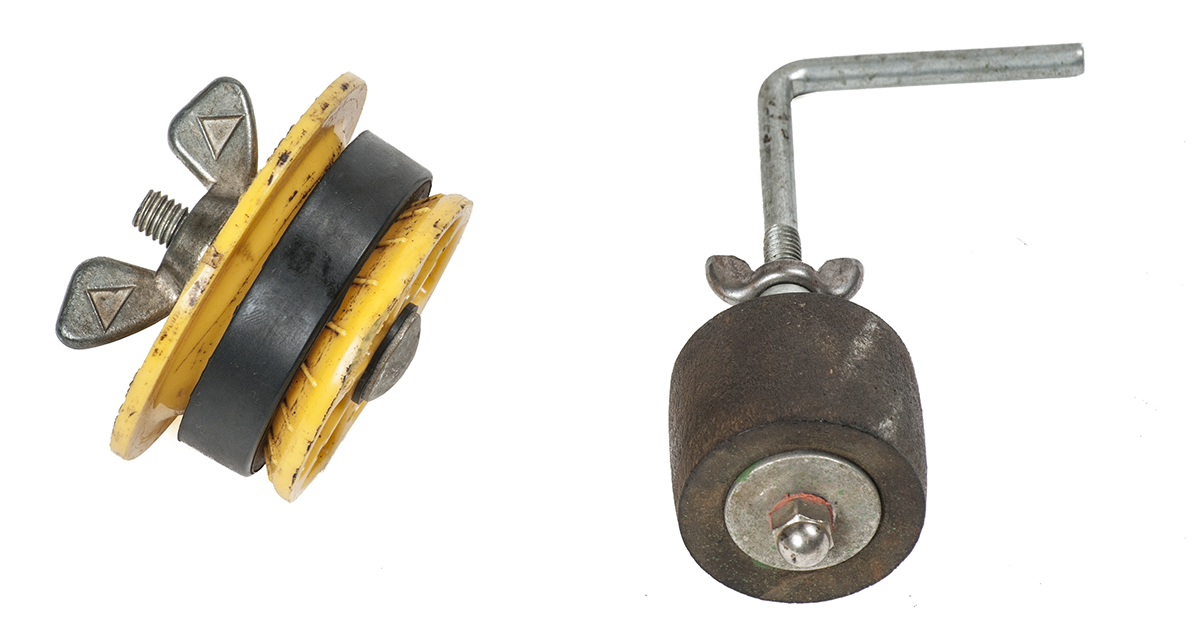
When sealing open pipe and fitting hubs for testing, you may use an expansion plug. These devices are not inflatable but use the expansion of a rubber sleeve to provide a seal. The expansion plug is inserted in the opening and tightened by hand or a smooth-faced wrench (Figure 2).
Water Pressure Tester
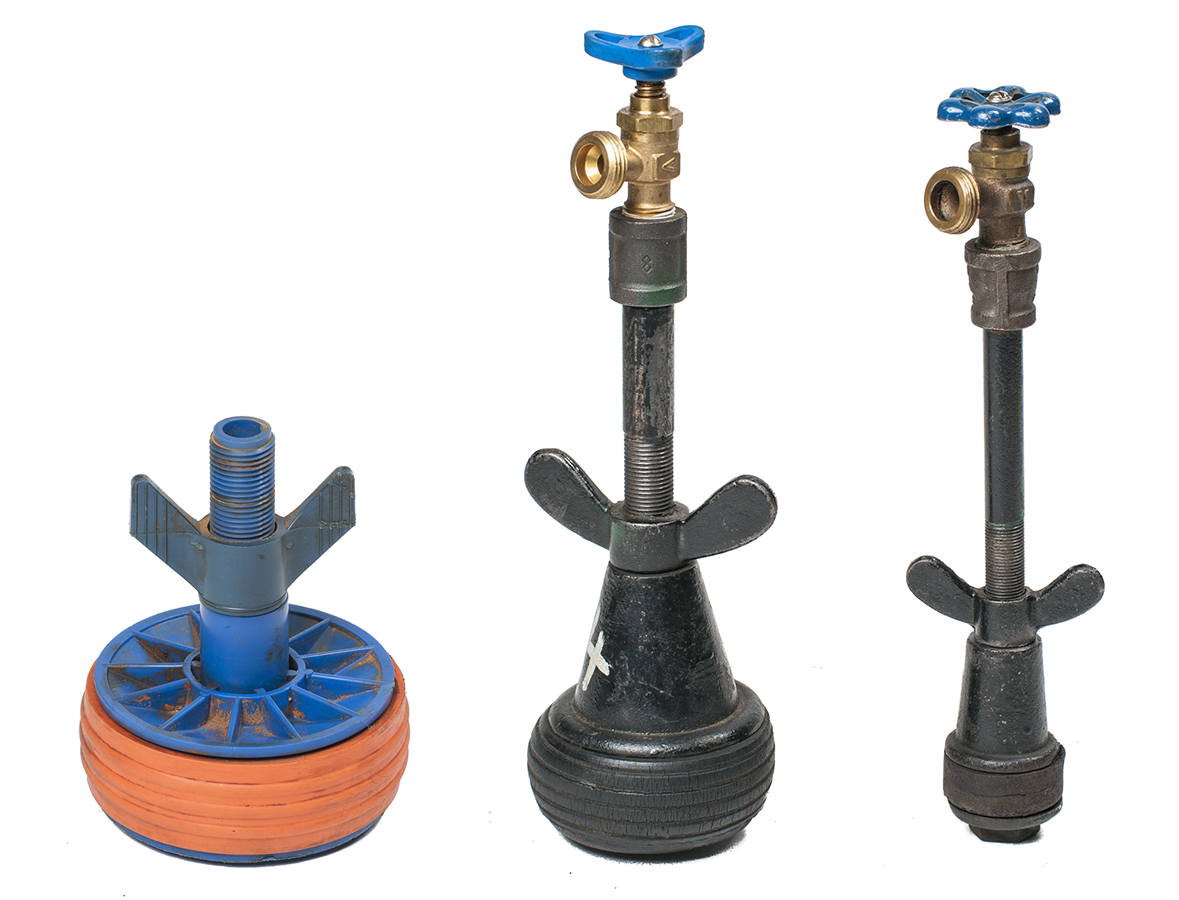
A water pressure tester allows you to introduce and measure the water pressure in a plumbing system. Used in conjunction with open centre test plugs, it allows access to the DWV system without cutting lines or creating leaky threaded joints (Figure 3).
Air Pressure Test Equipment
Another acceptable method for testing drainage and venting is an air pressure test. This is recommended if testing must be done in sub-zero temperatures or over water-sensitive areas, such as computer labs, hospital operating theatres, and rooms containing archives. Although these situations are rare to most installers, air tests have been employed when testing DWV systems in similar environments. As with a water test, the entire system or section you are testing must be completely sealed with airtight test plugs. The air pressure may be introduced into the system with a compressor, provided that a properly calibrated regulator is installed.
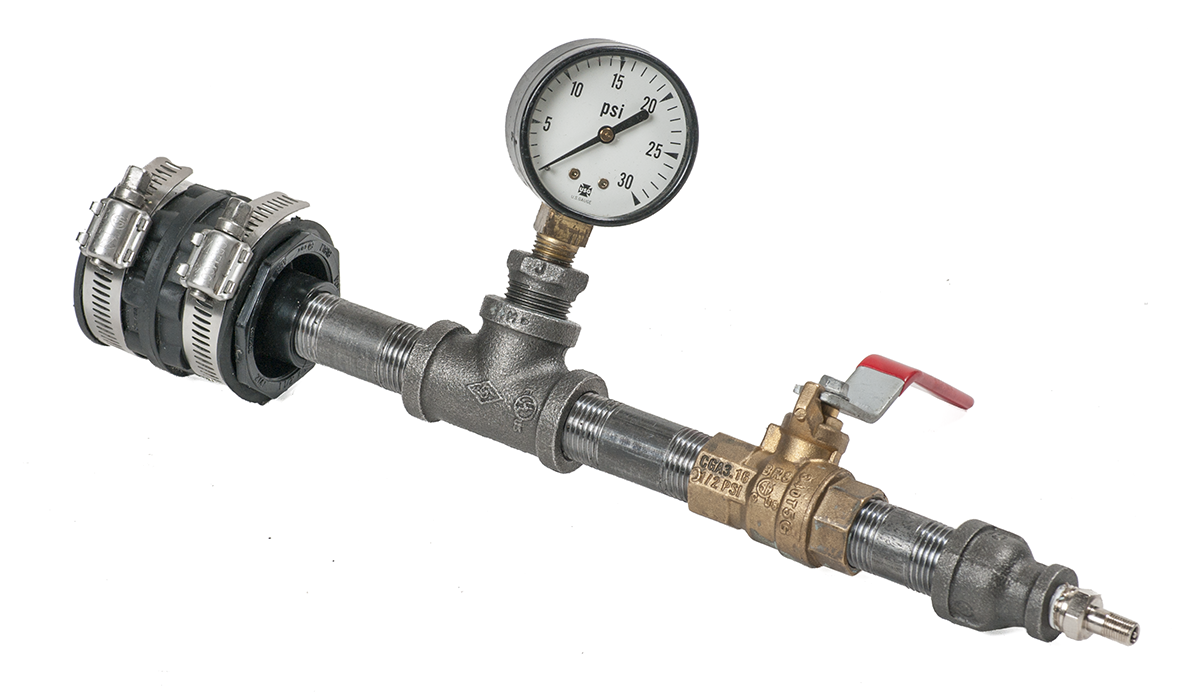
The air pressure may be introduced and recorded through a pressure gauge and Schrader valve combination (Figure 4).
A shop-built pressure testing assembly can be added to the drainage system. Pressure is applied through the Schrader valve, then the ball valve is closed. The system should hold pressure for 15 minutes at 5 psig when tested.
Smoke Test Equipment
Smoke testing requires the use of a blower and a controlled smoke source.
Blowers
The NPC requirements for smoke testing identify a static pressure of a 25 mm (1 in.) water column. This requires the use of a blower capable of producing the test pressure. Two types of blowers are available for smoke testing DWV systems:
- Squirrel cage
- Direct-drive propeller
Squirrel-cage blowers are generally larger and can provide more static pressure in relation to CFM output. The output of the squirrel-cage type is usually adjustable by alternating pulleys and belts to meet the demands of the job.
Propeller-style blowers are usually more compact, and the output is not adjustable since the fan blade is attached directly to the engine shaft.
Smoke Sources
Two types of smoke sources are currently offered for smoke testing DWV systems:
- Smoke candles
- Smoke fluids
To use a smoke candle, simply place one on the fresh air intake side of the blower. Once the candle has been ignited, the exiting smoke is drawn in with the fresh air and blown down into the system. This type of smoke is formed by a chemical reaction and has a high atmospheric moisture content. It is very visible even at low concentrations and extremely effective at finding leaks.
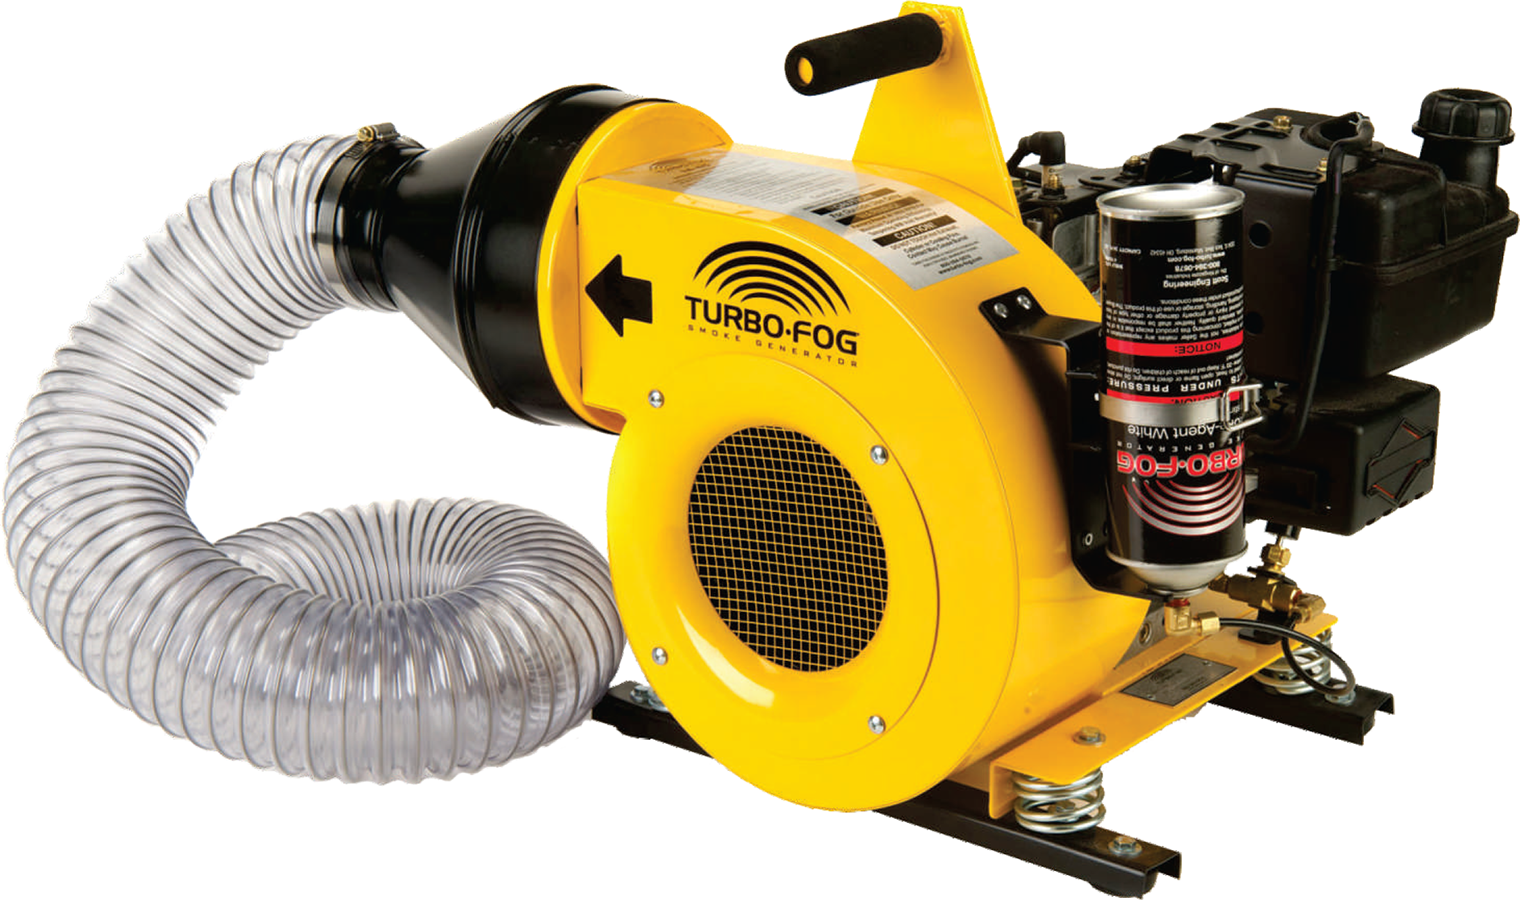
A smoke fluid system involves injecting a smoke fluid (usually a petroleum-based product) into a heating chamber, such as the engine exhaust muffler of a portable blower engine (Figure 5). The smoke is then exhausted into the fresh air intake side of the blower. Smoke fluids do not consistently provide the same quality of smoke because as fluid is injected into the heating chamber, it immediately begins to cool the heating surface. The heating chamber will eventually reach a point where it is not hot enough to completely convert all the fluid to smoke, and it will then produce thin, wet smoke that is difficult to see. This can happen quickly, depending on the rate of fluid flow. Some manufacturers have taken steps to address this issue and now offer insulated heating chambers to help maintain necessary temperatures.
DWV Test Procedures
Test procedures vary with the type of test needed for the installation.
Water Test
A water or hydrostatic test is the most common test used to inspect a DWV installation. This is the recommended test in most plumbing codes, weather permitting. Before starting the test, all bends, changes of direction, and ends of runs should be properly restrained. Cap or plug all openings in the lower part of the section to be tested. Fill the system to be tested with water at the highest point, if available. If this is not possible due to job-site conditions, use an open centre test plug.
Filling the system slowly should allow any air in the system to escape as the water rises in the vertical pipe. All air entrapped in the system should be expelled prior to beginning the test. Failure to remove entrapped air may give faulty test results. Once the piping has been filled to 3 m (10 ft) of head, the section being tested should be visually inspected for leaks. If leaks are found, drain the system, disassemble the joints, and check for proper installation. Once you have successfully tested the system, drain it and prepare the next section for testing.
In single-family houses, an adapter with a hose bib is commonly attached to a trap arm. Water is fed through a hose connected to the bibb, and the system is filled until water spills from the roof vent. This method eliminates the need to get a hose into the open vent on the roof, which would have created issues with fall arrest procedures.
Air Test
Prior to performing the air test, all threaded openings shall be sealed with a manufacturer’s recommended sealant. All additional openings should be sealed using test plugs recommended for use in performing air testing. It is important to note that manufacturers of cast-iron soil pipe and fittings joined with rubber compression joints or MJ couplings expect to have a reduction in air pressure during a 15-minute test. This drop in air pressure does not indicate a failure of the system or that the system will leak water. The reduction occurs because air molecules are much smaller than water molecules and can escape through microscopic perforations in the pipe wall formed during the casting process.
However, a reduction of more than 7 kPa (1 psi) during the test period indicates a failure of the test. The system shall be pressurized to 35 kPa (5 psig) using a gauge graduated preferably to not more than three times the test pressure. Upon completion of the test, depressurize the system and remove the test plugs.
Smoke Test
When a system has been completely installed with some sections obscured from view, a smoke test may be required by engineers, architects, or plumbing codes to find leaks in the piping. The test is applied to all the parts of the drainage and venting system after all fixtures have been permanently connected and all traps have been filled with water. A thick, penetrating smoke produced by one or more smoke machines is introduced into the bottom of the system through a suitable opening. As the smoke appears at the stack opening on the roof, the opening is closed off and the introduction of smoke is continued until a pressure equal to 25 mm (1 in.) of water is built up and maintained for 15 minutes without the addition of more smoke. Under this pressure, smoke should not be visible at any point, connection, or fixture. To eliminate drafts, all windows in the building should be closed until the test has been completed.
Ball Test
A ball test does not check for leaks but instead ensures the drainage pipes have a proper grade. The local plumbing inspector may exercise discretion and insert a ball into a fitting to check for an adequate grade; if all is well, the ball will make it to the bottom point, which is normally a cleanout.
Duration
A DWV system undergoing pressure testing using an approved method and procedure shall withstand the test pressure for 15 minutes while the plumbing inspector is present.
Inspection
Upon completion of the roughed-in piping installation, the piping of plumbing drainage and venting systems shall be tested by water or air to prove it is watertight. The inspector’s job is to make sure that the testing of the DWV system follows the plumbing code requirements. The inspector may require the removal of any cleanout plugs to determine if the pressure has reached all parts of the system.
During the construction of any project, large or small, the DWV test will be witnessed and signed off by the AHJ upon satisfactory completion of each phase. The plumbing contractor should record and maintain detailed inspection and testing data showing the date, time, and names of people participating in the inspection and testing.
Documentation
It is safe to say that the DWV system is an important part of the building design and function, which is why the final plumbing installation must be inspected before calling for the final building inspection. Once the plumbing and other individual disciplines have substantially completed their work, a certificate of occupancy may be issued.
A certificate of occupancy is a document issued by a local government agency or building department certifying a building’s compliance with applicable building codes and other laws and indicating that it is in a condition suitable for occupancy. The procedure and requirements for the certificate vary widely from jurisdiction to jurisdiction and with the type of structure. Some projects may require certification from the installer that the plumbing system functions according to the approved design.
 Self-Test D-4.2: Testing Methods
Complete Self-Test D-4.2 and check your answers.
If you are using a printed copy, please find Self-Test D-4.2 and Answer Key at the end of this section. If you prefer, you can scan the QR code with your digital device to go directly to the interactive Self-Test.

References
Kingscote Chemicals. (n.d.). M-45 plumbing kit. Kingscote Chemicals [Division of Kingscote Industries]. https://www.kingscotechemicals.com/product/m-45-plumbing-kit/
Skilled Trades BC. (2021). Book 2: Install fixtures and appliances, install sanitary and storm drainage systems. Plumber apprenticeship program level 2 book 2 (Harmonized). Crown Publications: King’s Printer for British Columbia.
Trades Training BC. (2021). D-4: Test sanitary and storm drainage systems. In: Plumber Apprenticeship Program: Level 2. Industry Training Authority, BC.
Media Attributions
All figures are used with permission from Skilled Trades BC (2021) unless otherwise noted.
- Figure 5 M-45 Plumbing Kit from ©Kingscote Chemicals [A division of Kingscote Industries] (n.d.) is used with permission.
A device used to seal pipe openings during leak testing. Test plugs come in different types, including inflatable and expansion plugs, and help keep air or water sealed inside the system. (Section D-4.2)
Disposable caps used to seal pipe openings during leak testing. they are designed for single-use applications and are typically removed and discarded after testing is complete. (Section D-4.2)
A plumbing fitting shaped like a "y" that allows one pipe to join another at a 45-degree angle. it is commonly used to connect branch lines to a main drain line, helping to maintain smooth water flow and reduce clogs. (Section D-4.2)
A test that checks for leaks by filling pipes with water and keeping them pressurized for a set amount of time. (Section D-4.1)
A type of test plug that is used to seal pipes during testing. It has a hole in the middle, so tools can be used to adjust or measure the pressure inside the pipe without taking the plug off. (Section D-4.2)
A test that checks for leaks by filling pipes with pressurized air and observing if the pressure drops. (Section D-4.1)
A method used to detect leaks in a drainage system using thick smoke. The smoke is blown into the pipes, and if it escapes from any area other than the designated openings, it means there’s a leak. (Section D-4.2)
A type of blower that has a round fan inside it, kind of like a hamster wheel, to push air through a system. It can move a lot of air and is good for testing large pipes or systems.
A type of fan that blows air to test pipes or systems. The fan blades are connected directly to the motor, and it helps push air through the system to check for leaks. (Section D-4.2)
A small device that creates smoke when lit. It’s used in smoke testing to help find leaks in pipes. When the candle is lit, the smoke is blown into the pipes to see if it escapes anywhere. (Section D-4.2)
A machine that creates smoke by turning a special fluid into smoke. This is used in smoke testing to check for leaks in pipes, just like the smoke candle. (Section D-4.2)
