D-2.5 Installing DWV Systems
This chapter covers the two primary aspects of the actual plumbing installation:
- Material-handling procedures
- Installation process factors
Procedures for Handling Plumbing Materials
A fundamental aspect of achieving successful plumbing installations is adhering to proper procedures for handling materials. This adherence is not merely a matter of operational efficiency but is vital for ensuring safety, job control, and overall project success.
There are many aspects related to proper handling plumbing materials, including:
-
- Safety
- Handling procedures
- Receiving and shipping materials
- Hazardous labels
- Storage
- Moving
- Product protection
- Disposal
- Recycling
Safety
Plumbers work in a variety of settings, some of which are hazardous. When installing a DWV system, the plumber must comply with Occupational Health and Safety (OHS) policies and procedures. These requirements include the following:
- Inspect equipment and tools for safety hazards before each use.
- Handle all hand and power tools in a safe manner.
- Wear proper personal protective equipment (PPE) at all times.
- Follow OHS lockout/tagout and confined space procedures.
- Know where the Safety Data Sheets (SDS) are kept and how to interpret an SDS.
- Take precautions to avoid inhaling dangerous vapours by using proper ventilation and/or properly fitted respirators.
- Use fall protection and other precautions when working at heights.
- Ensure that use of ladders complies with OHS guidelines.
- Keep work areas clear of clutter and equipment.
- Use safe lifting techniques.
- Report all incidents to your supervisor immediately.
Considerations When Handling Materials
In addition to instruction, training, and general safety principles, job site controls can help reduce workplace accidents involving the moving, handling, and storing of materials. Whether moving materials manually or mechanically, the tradesperson should know and understand the potential hazards associated with the task at hand and how to control their workplaces to minimize the danger.
Every employer must ensure that the safe work procedures for material handling and storage are followed. These procedures include the following:
- Facilitate and/or provide appropriate training as necessary to workers with respect to safe material handling and storage.
- Monitor and inspect material-handling and storage facilities to ensure hazard control in these areas.
- Ensure that, where appropriate, shelving is weight-rated as required by regulations.
- Identify and select materials for sorting, stacking, and stockpiling according to supervisor instructions or workplace requirements.
- Identify handling characteristics of materials and apply safe manual handling techniques.
- Apply specific handling requirements and protection for non-hazardous materials and chemicals.
- Ensure that materials are stored, stacked, stockpiled, protected, and clear of traffic ways for ease of identification, retrieval, and prevention of damage and cross-contamination in accordance with workplace requirements.
- Erect signage and barricades to isolate stored materials from workplace traffic or access.
- Identify hazardous material for separate handling by authorized persons.
- Use dust suppression procedures to minimize health risk to personnel in the workplace vicinity.
- Assess and control manual handling risks and provide instruction, training, and supervision for manual material handling. Risk controls may include:
- Organizing the work to reduce the number of manual handling tasks involved.
- Not working long periods of strenuous manual material handling.
- Making sure the workplace layout allows enough space to move and work safely and comfortably.
Packaging/Shipping
Construction materials are received at and shipped from the job site on a regular basis. When receiving materials:
- Inspect the shipment for external damage and then remove the packaging and inspect the contents for any physical damage in the presence of the delivery driver.
- If there is any damage, you must indicate such on the delivery receipt. When you sign the delivery ticket and do not note any damage, the merchandise becomes your property, and the freight company will not allow a claim.
- Make sure hazardous products are identified for separate storage, transport, and handling by authorized persons, in line with workplace and safety procedures.
- On arrival, check for any spillage or leakage. Check to see that hazardous products are properly labelled. An SDS should be readily available.
When shipping materials:
- Determine the method of shipment and prepare bills, invoices, and other shipping documents.
- Assemble containers and crates, pack goods to be shipped, and prepare identifying information and shipping instructions.
- Ensure that pallets are safe to use and loaded and transported safely:
- Do not use pallets that are damaged or structurally inadequate for the load.
- Do not overload pallets.
- Secure unstable loads to the pallet where appropriate.
- Hazardous products should be transported and handled in accordance with regulatory requirements, including appropriate signage, markings, and safety precautions. WHMIS labels and SDS are mandatory in Canada.
Labelling
All hazardous products delivered to construction sites are labelled in accordance with the Hazardous Products Regulation (Canada). When working with this type of product, follow these guidelines:
- Never accept any container of hazardous goods unless it is properly labelled.
- Never remove, deface, modify, or alter any supplier label.
- When a hazardous product is used at a work site in a container other than the original supplier’s container, a workplace label must be applied to the container immediately, except if transferred by a worker into a container for use during the same shift, provided that the worker maintains control of the new container and finishes use in that shift
Storage
Some materials deteriorate rapidly. Moisture can lead to damage from corrosion or growth of mould or fungi. It is essential that construction materials have the durability required for their area of use. Materials should be stored properly in accordance with the manufacturer’s instructions to afford maximum protection against damage caused by weather, corrosion, mechanical force, and other causes before installation. Materials should be stored under a cover and on level, well-drained, and well-maintained hard-standing ground. Plastic pipes and fittings must be stored so that they are not exposed to sunlight, which can cause deformation or ultraviolet damage.
Securing
Construction materials that are stored on site must be secured correctly and safely according to workplace procedures. These procedures could include the following:
- Ensure that pallets used are safe to use and loaded and transported safely:
- Do not use pallets that are damaged or structurally inadequate for the load.
- Do not overload pallets.
- Secure unstable loads to the pallet where appropriate.
- Ensure that storage racks and shelves are secure and capable of handling the loads placed on them. If there is any evidence of potential failure, discuss the situation with the site supervisor.
- Report the following to the site supervisor:
- Deformation of the structure (e.g., sagging shelves and upright supports that are leaning or otherwise unstable)
- Heavy weights (e.g., items that might exceed the safe load limit of the shelving)
- Excessive materials (e.g., too much material on the shelf)
- Pile materials at work sites so they do not create tripping/slipping hazards.
- Do not pile other materials on pipe or behind pipe in a manner that requires a worker to walk over the pipe to reach them.
- Pile all materials clear of walkways and entrances.
- Pile higher rather than wider in order to allow a worker to approach all materials while walking on firm, unobstructed footing rather than having to weave through materials that create a tripping hazard or walking on materials that can create a tripping hazard or a potential for falls and property damage.
- If you are searching for something specific, clean up after yourself.
Moving
Materials that have arrived on site and been securely stored will eventually have to be moved and installed. Workers can be at risk of hazards when working around vehicles and mobile construction equipment at construction projects. These hazards can result in serious injuries or death. Incidents can be prevented by ensuring that:
- Trained signallers and competent equipment operators are in place.
- Construction projects are planned and organized to eliminate or reduce vehicles and construction equipment from operating in reverse.
- Workers wear personal protective equipment (PPE), including high-visibility clothing.
Hoisting and Rigging
Choosing the correct hoists, cranes, or rigging products for an application is always critically important due to the inherent risks involved in overhead lifting. Incorrectly specified overhead lifting equipment could fail, resulting in costly equipment damage, personal injury, and lost productivity. To prevent this, when hoisting and rigging on a construction site, follow these guidelines:
- Before starting hoisting, be aware of all possible unsafe conditions within the area in which the hoist will take place.
- Maintain safe clearances to overhead power lines, in keeping with regulations.
- Control traffic with flag persons, traffic cones, and/or barricades if lifting in areas of public travel.
- Use ropes or safety ribbons to secure the area and keep out anyone not involved in the hoisting procedure.
- Use only proper devices specifically designed and rated for lifting.
- Do not use frayed or torn cables or slings. If possible, obtain the weight of the piece being lifted to ensure that it is within the capacity of the lifting device. If the exact weight is unknown, test the lift in a safe location before lifting.
- Persons giving instructions to operators should know the proper hand signals.
- When hoisting equipment onto roofs, anyone closer to the roof edge than allowed by regulations must wear a proper safety harness secured to the building in such a manner as to prevent injury.
Work Platforms
Work platforms are often used to move materials around on a job site or to lift them into place for overhead installations. It is therefore important to consider them when planning a project.
The two basic types of elevating work platforms are boom lifts and scissor lifts. Both types come in on-slab models for use on smooth, hard surfaces — such as concrete or pavement — and rough-terrain models for use on firm, level surfaces — such as graded and compacted soil or gravel.
Both types share three major components: base, lifting mechanism, and platform assembly. The machines come with load charts that show safe operating configurations. Machines with booms long enough to cause overturning at low boom angles are required to have radius-limiting interlocks to prevent operation in unstable configurations.
Elevated work platforms are designed for different uses. It is essential to select the right machine for the job. Typical mistakes in platform selection include the following:
- Using an on-slab machine on rough terrain
- Using a unit undersized with respect to height, reach, and lifting capacity
- Extending the platform with planks, ladders, or other devices because the machine cannot reach the required height
- Failing to assess the job needs before starting and using the wrong machine or not ordering the right machine to do the job
When selecting an elevating work platform, keep in mind the following job site considerations:
- Capacity: does the machine have the lifting capacity, reach, and height to complete the task?
- Surface conditions: are the surface conditions hard or soft, sloped or level? Will the ground have an effect on the type of machine selected?
- Platform size and configuration: do you need a regular or extendable platform? Is rotation required? Are there space restrictions to consider?
- Mobility: is a boom type better suited to the task than a scissor lift?
- Material to be lifted: will the machine be able to lift the size and weight of material required for the job?
- Access: will the machine be able to travel around the workplace safely? Are there obstructions or depressions that would restrict the use of certain machines?
- Operator skill or training: are the people on site that can competently operate the machine? If a propane-powered engine is used, has the operator received propane training?
- Work environment: if the work is to be done indoors or in a poorly ventilated area, will an electrically powered machine be required
Product Protection
Builders and contractors alike have realized that protecting installed materials in the finishing stages of a project is 10 times more cost effective than spending time making repairs after completion. Interior protections are used on installed countertops, fixtures, walls, windows, cabinetry, floors, and stairs. When installed, materials are protected and end users report significantly fewer deficiencies upon completion, which increases their satisfaction with the contractor. This also increases the likelihood that the contractor will be employed on future projects.
Disposal
Construction site material management should aim to minimize waste, thereby reducing waste disposal and the release of pollutants. The initial step in a construction waste reduction strategy is good planning. The environmental impact of the disposal of materials at the end of their serviceable life must also be considered. Follow these guidelines:
- Reduce rejects by using high-quality materials, such as engineered products.
- Set aside construction and demolition materials that are in good condition.
- Sort your materials before disposal; you may find recycling or reuse opportunities. This may save you money and reduce environmental impacts at the same time.
- Think about the types of waste you produce and whether they need to be dealt with as hazardous waste.
- Make sure you recycle any waste because many plumbing materials contain recyclables, such as copper, steel, lead, cast iron, and aluminum.
Recycling
Some construction materials can be recycled directly into the same product for reuse. Others can be reconstituted into other usable products. The most important step for recycling construction waste is onsite separation. This will take some extra initial effort and training of construction personnel. Once separation habits are established, onsite separation can be done at little or no additional cost, increasing profitability and economy for the builder and customer.
Installation
Staying educated on relevant codes, materials, tools, and hazards is an important part of every plumbing professional’s job. The practice of actually installing a DVW plumbing system requires the plumber to consider a number of factors during the installation process.
Tools and Equipment
On the job site, it has always been about having the right tools and equipment. Plumbers use a variety of tools and equipment to perform a DWV installation (power and hand tools, welding and soldering/brazing equipment, hoisting and lifting equipment, etc.). Specific certification may be required to perform some of those tasks or use some of that equipment. Too often, injuries occur because corners are cut when using the wrong tools and equipment for the job. The scope of the installation will dictate the tools required. For example, routing and securing pipes within house framing requires a variety of cutting and drilling tools, including reciprocating saws, power drills, and circular saws.
On larger projects, machinery and equipment such as scissor lifts and excavators may be used. In either instance, it is very important that tools be properly maintained in accordance with the manufacturer’s specifications.
Determining Slopes
Horizontal drains are designated to flow at half to two-thirds full capacity under uniform flow conditions, which minimizes pressure fluctuations in the system. The NPC dictates minimum slopes according to the size and function of the pipe. All drainage pipes must be installed with a minimum slope of 1:50. In some situations, the slope of a building drain may be reduced to 1:100 if it is at least 100 mm (4 in.) in size. This reduction in slope will allow for less fall over a given length, which may be needed to match the invert of a previously installed municipal drainage connection.
Installing Components
The installation of components in a DWV system requires the plumber to possess specific knowledge and the ability to do the following:
- Interpret codes and regulations pertaining to DWV component installation.
- Interpret information pertaining to DWV components found on drawings and specifications.
- Identify types of DWV component supports and their applications.
Cleanout Locations
When designing and installing DWV systems, it is important for the plumber to consider how the drainage system will be maintained. The NPC has requirements for the location and size of cleanout fittings in the drainage pipes to allow drain-cleaning machines to have access to the drainage piping. Generally, a distance of about 900 mm (3 ft) from a cleanout to any obstruction or wall is required.
When planning the route for the drainage piping, the plumber must allow for cleanouts to be installed at appropriate intervals and in a manner that will allow access without causing excessive disruption to the building finishes. For example, a building drain installed below grade can be routed in corridors or aisles so that cleanouts are easily accessible.
When drains serving floors above grade require cleanouts, consider the spaces on the floor below where the drain piping changes direction. Try not to locate cleanouts in ceiling spaces over sensitive equipment. Cleanouts and drains should be routed to avoid being over food preparation areas, hospital operating rooms, computer rooms, or other critical areas.
Testing
DWV piping systems must be tested using methods determined by the NPC. The methods and requirements are detailed in Competency D-4: Test and Commission Sanitary and Storm Drainage Systems of this series. System testing is usually done after each phase of the rough-in by sealing off all trap arms and the building drain using plugs or inflatable balls. The most common test is the “water test,” in which the plumber fills the piping system with water and then visually inspects the system for integrity. In regions that experience extremely cold weather, the water test could be used if filled and inspected in the same day. Typically, in situations where the weather does not cooperate, an air test may be applied, requiring all openings to be sealed.
Other less frequently used methods are the ball test and the smoke test.
After the plumbing fixtures have been set and their traps filled with water, their connections shall be tested and proved gastight and/or watertight by filling each fixture to the overflow and performing a visual inspection.
Inspection
Plumbing inspections are carried out to ensure compliance with the requirements of the code, which contains the minimum health and safety requirements for plumbing installations.
Local municipal building bylaws dictate the frequency of inspections, which are typically required after the following construction phases.
- Plumbing underground: All drain and vent installations are completed with all required tests applied and prior to covering.
- Rough-in: All drain and vent installations are completed with all required tests applied and prior to covering.
- Final plumbing: All above plumbing and drainage inspections are approved and all plumbing fixtures are installed and operating in final condition.
A certified building/plumbing inspector reviews the assembly of the DWV system components for compliance with the applicable code. Areas where the inspector will be focusing are:
- Materials and equipment
- Testing of drainage and venting systems
- Protection of piping
- Support of piping
- Trap installation
- Arrangement of drainage piping
- Cleanout installation
- Slope and length of drainage pipes
- Arrangement and size of venting pipes
Here is a bit of advice that will make your working life as a plumber easier: get to know your inspector. Communication is a major component of any good project. Knowing the inspectors in your area and what they expect will make jobs run more smoothly. Most inspectors are approachable and helpful as long as you do not convey a bad attitude.
Sealing Penetrations
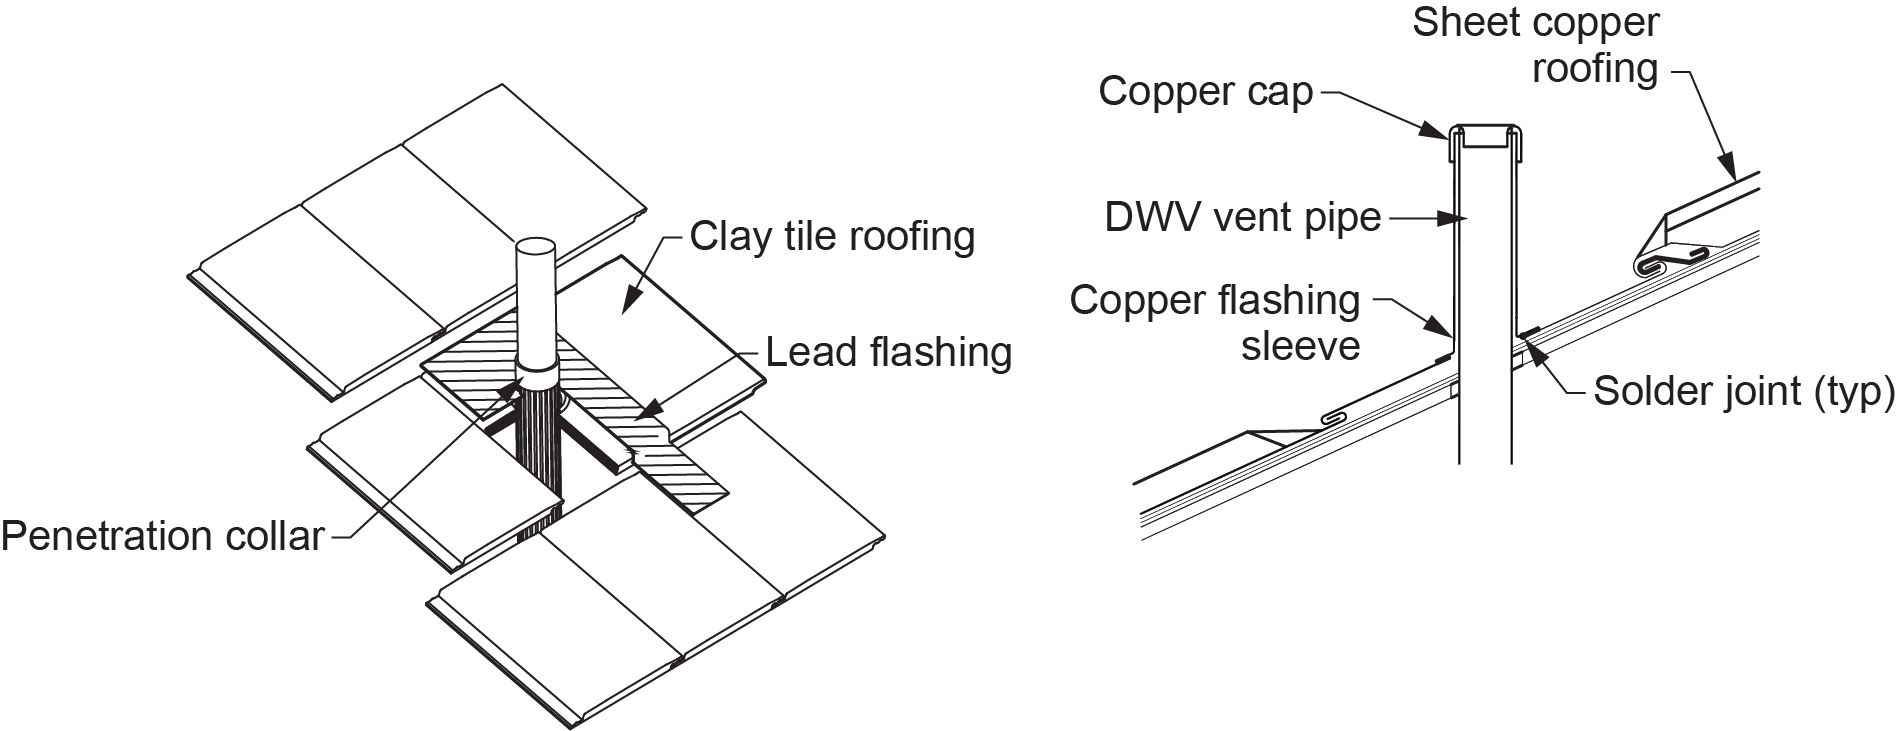
Any exterior penetrations through a building structure must be made watertight. Roof penetrations around vent pipes must be made watertight using an approved flashing material and shall not restrict the internal cross-sectional area of the pipe. The roof slope and cladding material used typically dictate the type of flashing required. Always refer to the manufacturer’s installation instructions when installing specialty flashings.
Sloped roofs require the flashing material to be interwoven with the roofing material (Figure 1).
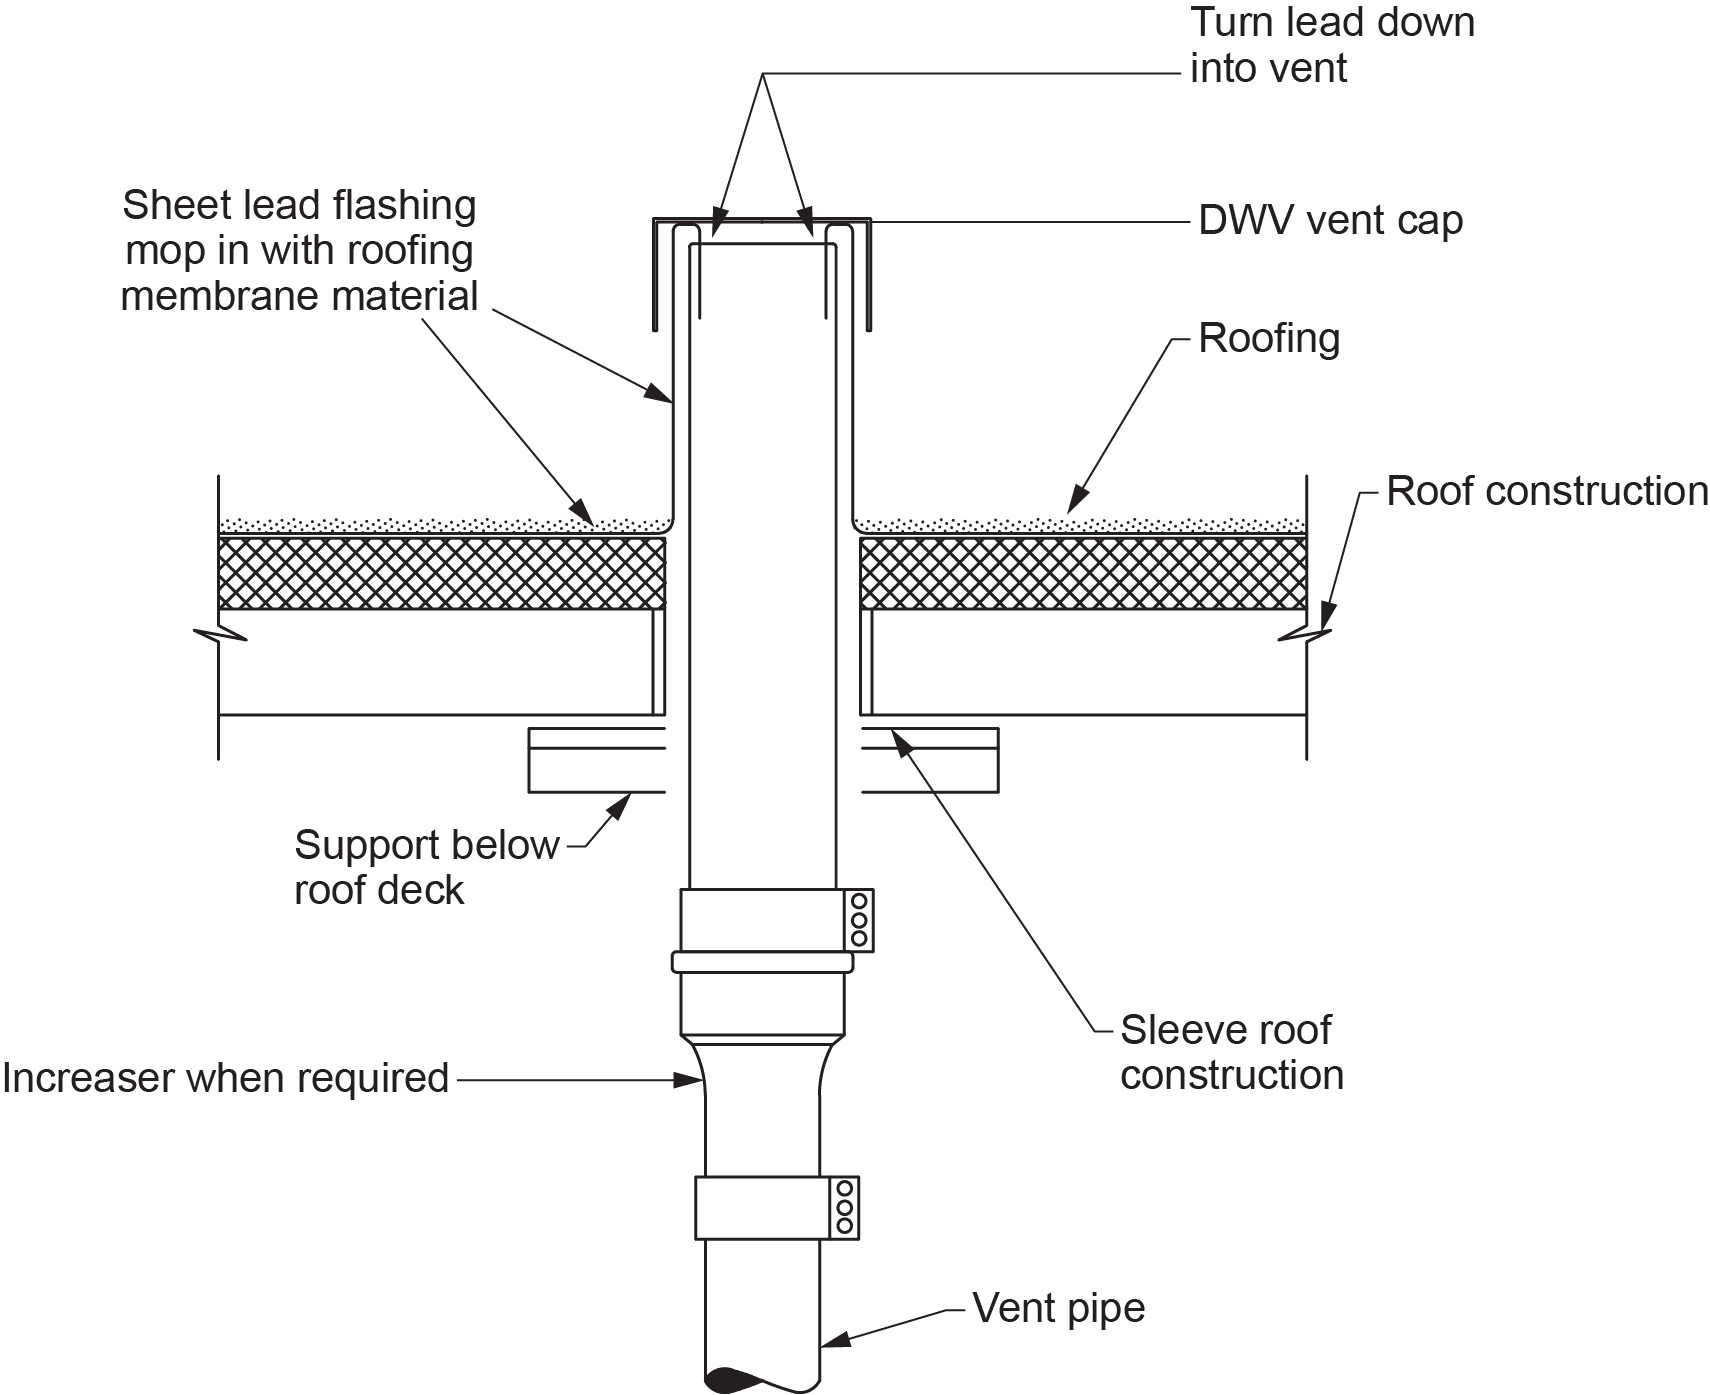
Flat roofs, which are mostly found on commercial buildings, require the vent flashings to be “mopped” or “torched” into the roofing membrane to provide a watertight seal. Figure 2 illustrates a typical penetration through a flat roof.
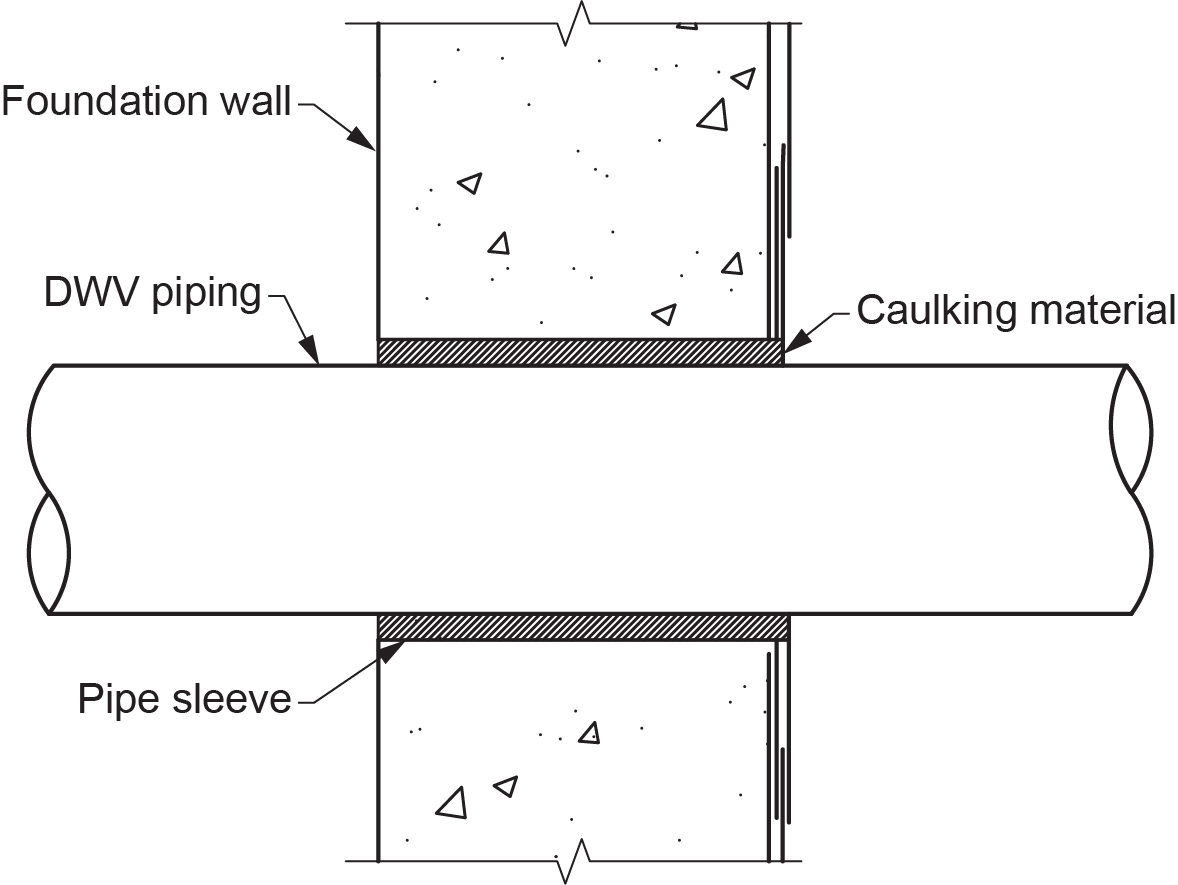
When drainage pipes are run through the foundation walls, the penetration must be sealed by one of two general methods:
- Sleeve and caulking
- Mechanical seals
The sleeve and caulking method can be accomplished using a non-corrosive sleeve poured in place during construction (Figure 3). The sleeve should be 50 mm (2 in.) larger than the DWV pipe passing through it. This will provide an annular space between the pipe wall and the sleeve. Caulking the gap around the pipe is typically done with high-viscosity polyurethane or another approved material. This caulking material can be used on both wet and dry installations. One advantage to this method is that the seal will be able to stretch and contract along with the natural fluctuations of the foundation walls.
Mechanical seals (Figure 4) form a watertight mechanical seal between the pipe and the hole through which it passes. These sleeves use elastomeric sealing elements and adjustable pressure plates to provide the seal around the pipe.

Fire-Stopping
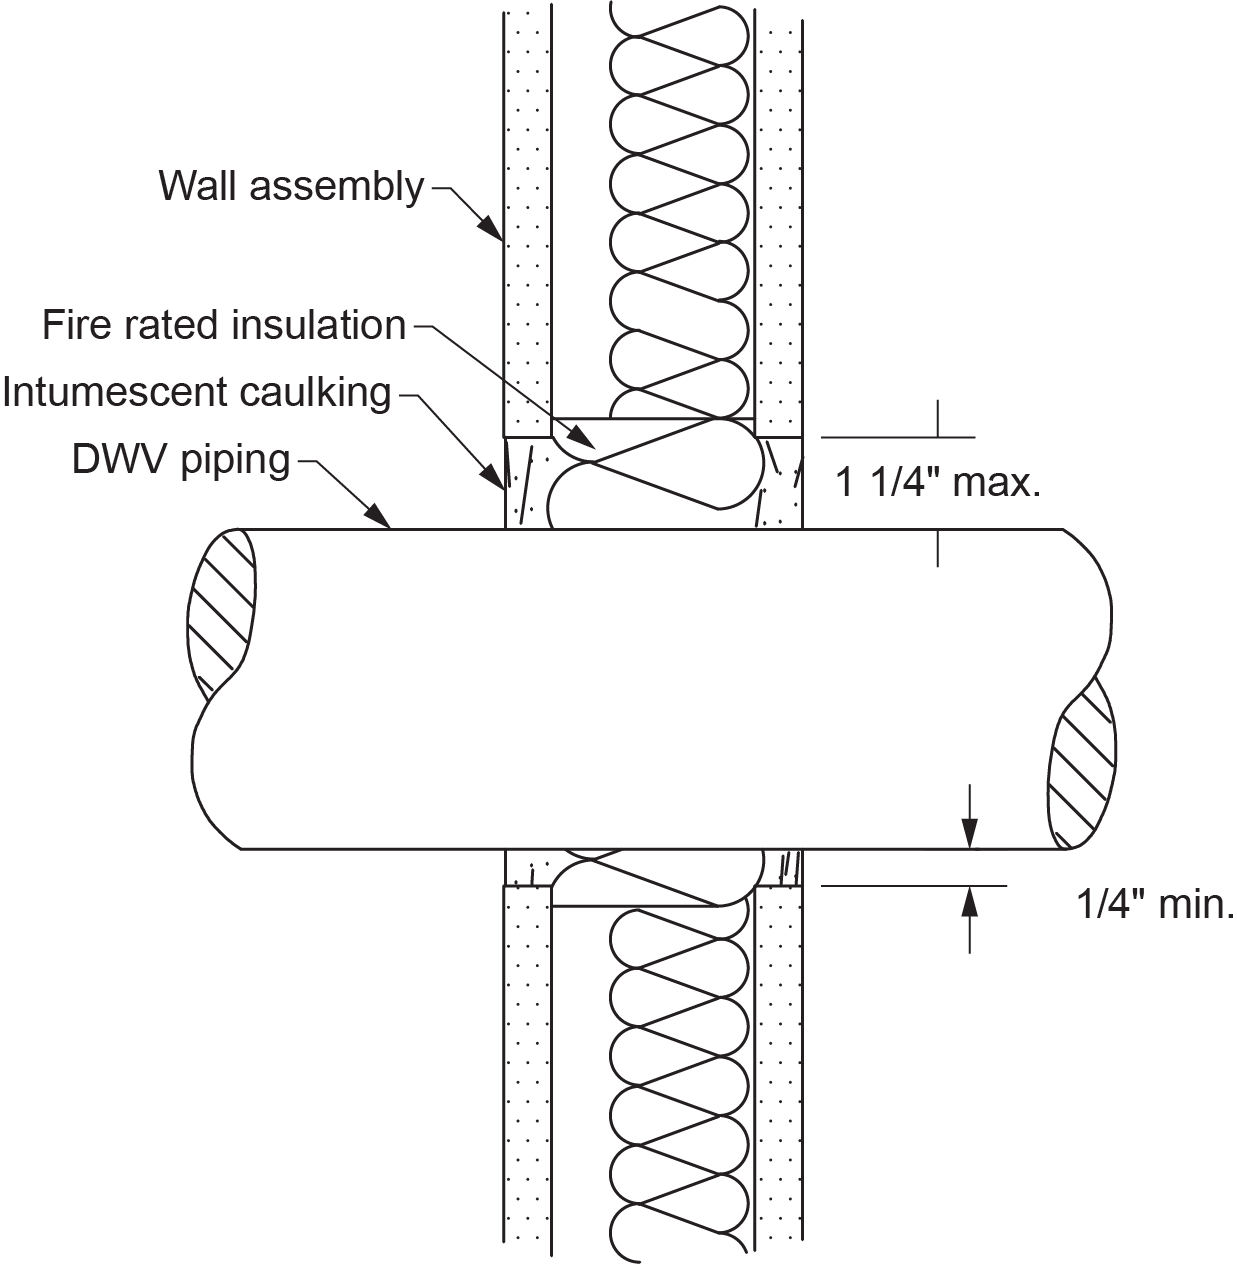
Every time a fire-rated wall or floor/ceiling assembly is penetrated by DWV piping, the penetrations have to be protected by fire-rated fire-stop systems in order to maintain the assembly’s intended fire rating. The size of the annular space to be filled and whether or not the pipe is combustible will dictate what type of fire-stopping system must be used.
When the annular space is relatively small — typically between 0.25 in. and 1.25 in. — the system could be special fire-rated insulation topped off with an intumescent caulking material (Figure 5). The term “intumescent” means that it swells when exposed to heat, closing off the opening.
On larger pipe penetrations resulting in a larger annular space ([latex]\tfrac{3}{4}[/latex] in. minimum), a restraining fire collar is sometimes used (Figure 6). The wrap strip on the collar uses a highly intumescent fire-stopping material. When exposed to fire, the wrap strip expands and forms a hard char to seal off the penetrating pipe and prevent the passage of fire and hot gases. The installation would be in conjunction with special fire-rated insulation and intumescent caulking of the annular space.

 Self-Test D-2.5: Installing DWV Systems
Complete Self-Test D-2.5 and check your answers.
If you are using a printed copy, please find Self-Test D-2.5 and Answer Key at the end of this section. If you prefer, you can scan the QR code with your digital device to go directly to the interactive Self-Test.

References
Skilled Trades BC. (2021). Book 2: Install fixtures and appliances, install sanitary and storm drainage systems. Plumber apprenticeship program level 2 book 2 (Harmonized). Crown Publications: King’s Printer for British Columbia.
Trades Training BC. (2021). D-2: Plan DWV systems. In: Plumber Apprenticeship Program: Level 2. Industry Training Authority, BC.
Media Attributions
All figures are used with permission from Skilled Trades BC (2021) unless otherwise noted.
Safety gear, such as gloves, goggles, and respirators, required to protect plumbers from workplace hazards. (Section D-2.5)
A document providing information on hazardous materials, including handling, storage, and emergency procedures. (Section D-2.5)
The process of safely receiving, storing, moving, and disposing of plumbing materials to prevent damage and ensure efficiency. (Section D-2.5)
The use of cranes, hoists, and rigging equipment to lift and position heavy materials safely on a construction site. (Section D-2.5)
Equipment such as scissor lifts and boom lifts used to elevate workers and materials to perform overhead installations. (Section D-2.5)
An access point installed in drainage and venting systems for cleaning and inspection services. (Section D-1.2; Section D-1.3; Section D-2.3)
A material used to create a watertight seal around vent pipes where they penetrate a roof, preventing water intrusion. (Section D-2.5)
